Project: Potemkin is a Star Trek fan series set in 2296, not long after the events of Star Trek VI.
The show centers around the exploits of veteran Starfleet captain Alec Grigory and the starship Potemkin. The last Constitution class ship still in service, the vessel has a unique crew of mostly inexperienced offers who continue the tradition of going boldly.
Filmed in Southwest Georgia (US), Project: Potemkin has released eight short vignettes and two full-length episodes. Although not on the same 'level' as many professionally-produced series, the show is definitely worth checking out.
Project: Potemkin's latest release is 'The Night the Stars Fell from the Sky'. After discovering M-rays on a primeval world, the crew must unravel the dark secrets of the planet's inhabitants.
'Night', overall, is a very solid episode that nicely ties in with established Original Series cannon. The fact that Potemkin's officers are supposed to be inexperienced is clearly reflected by the actions of this episode's central Vulcan character, Ensign T'Noshi. Although the acting across the board feels a bit stiff at times, it gets the job done.
The episode's sets and special effects are, for the most part, well-done for a fairly low-budget production. The ship's bridge feels a bit cramped, but showcases a nice blend of TOS and movie-era tech. Planet-side, the show makes use of greenscreen (combined with real-world footage) to create background imagery and the large-scale structures. The end result is fairly convincing. Space shots of the ship and planet are also CG; it's by no means high end, but adequate.
The uniforms worn by the crew are a bit of a TOS or Motion Picture throwback, not at all resembling the militaristic, maroon uniforms introduced in Star Trek II. It was good to see, however, that all the officers were finally given Starfleet chest insignia, something that was absent in previous episodes. Using these 'simplified' uniforms instead of the much more complex movie versions was clearly a cost-saving measure, but it really doesn't take away from the show.
The moral decision at the center of this episode is one that's been used many times before to great effect, and was just as effective here. My only real complaint was the captain's stance on this issue near the end of the episode. Although, to some degree, he rectified this in the final moments of the show, irreparable damage was already done. It's interesting to compare this to other similar situations in Trek, if for no other reason than to see the other side of the coin.
Despite Project: Potemkin's limited resources, the show is very watchable and a highly-respectable fan effort. As long as you're not expecting a Phase II-quality production, this is definitely worth taking a peek at.
Interested in writing a screenplay? Potemkin is currently accepting script submissions, something you won't find with many other productions.
'The Night the Stars Fell from the Sky' and previous installments can be viewed or downloaded here.
"Any significantly advanced technology is indistinguishable from magic." - from Arthur C. Clarke's Three Laws of prediction.
Friday, January 31, 2014
Wednesday, January 29, 2014
Tech Tutorial: Change a Video's Aspect Ratio Using VirtualDub
Recently, I was working on a video editing project in which I needed to change the aspect ratio of several clips to match the rest. After trying many free and trial programs that didn't give me the results I wanted, I stumbled upon VirtualDub.
VirtualDub is a "video capture and video processing utility for Microsoft Windows...designed to process linear video streams, including filtering and recompression." If you need to convert those pesky files but don't want to pay for it, this is a quick and easy solution.
At first glance, VirtualDub isn't much to look at, and doesn't appear very user-friendly. Don't let this discourage you -- VirtualDub is a powerful tool that gets the job done, and is quite usable even if you're not a multimedia expert. Just bear in mind that VirtualDub is not a general-purpose video editor; instead, it provides a few key tools to aid in your editing endeavors.
- Download VirtualDub and extract the files from the zip archive. Launch the application (it's self-contained and requires no installation).
 |
| VirtualDub folder. |
- Go to 'Video' > 'Filters'.
- Click 'Add'. A new window will appear with a list of various filters. Scroll down to near the bottom of the list and select 'resize'. Click 'OK'.
 |
| 'Add Filter' window. |
- Another new window will appear. Under 'Framing Options', click 'Crop to aspect ratio' and enter your desired aspect ratio (16:9, 4:3, etc.) in the fields below. Click 'OK'.
- Note that selecting one of the letterbox options will add black bars to the top and bottom of your video.
- Inputting your desired pixel size in the 'Size Options' section allows you to manually crop a video beyond standard aspect ratios.
 |
| 'Framing Options' window. |
- To compress your video, go to 'Video' > 'Compression' and select your desired compression codec. Click 'OK'.
- Choosing to leave your videos uncompressed will result in very large file sizes.
- Generally, the first DivX option is a good choice, but note that the codec you wish to use must already be installed on your computer.
 |
| 'Video Compression' window. |
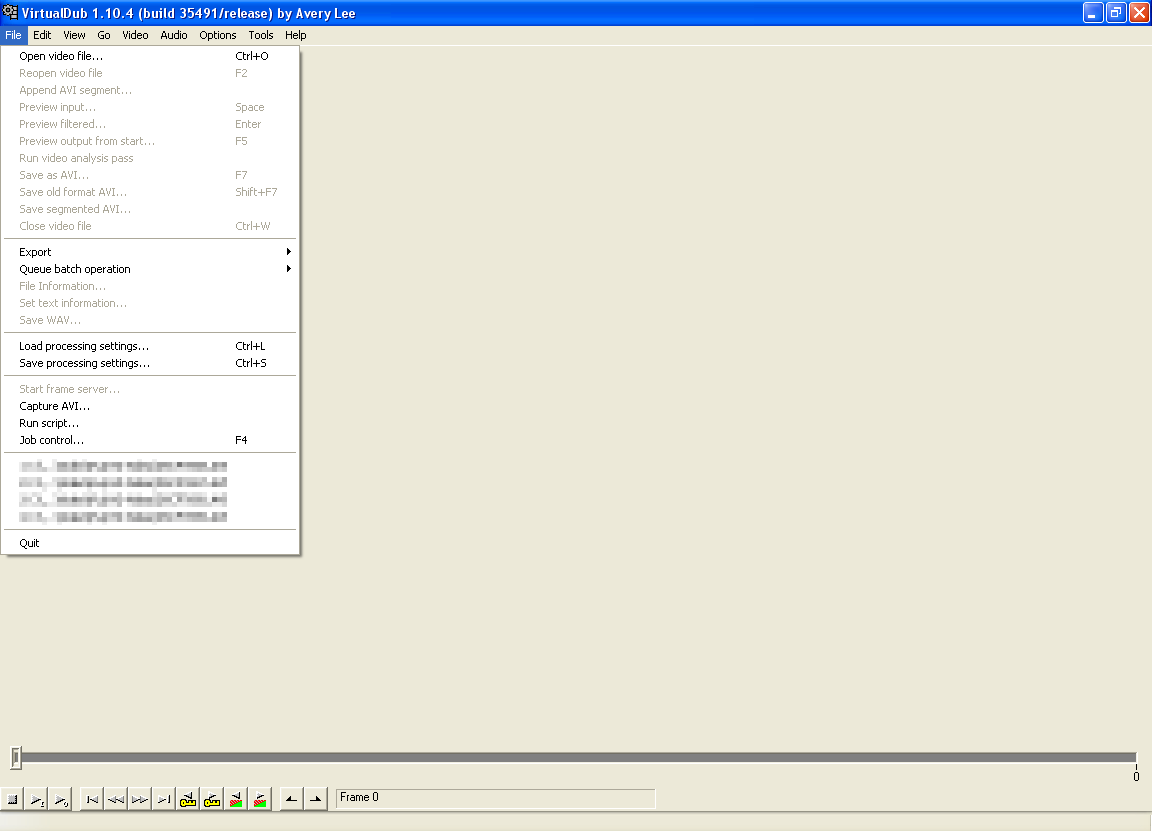
- Click 'File' > 'Open Video File' to import your clip.
- If you're working with MPEG-4 files, download this unofficial Ffmpeg Input Driver (as the program does not support this format out-of-the-box).
- Open either the 32 or 64-bit folder (check your version of Windows) and copy the contents into the 'plugins32' (or 'plugins64') folder of the VirturalDub directory.
- In addition, if your video is encoded in H.264, this codec will allow you to open the file and save it without any DivX errors.
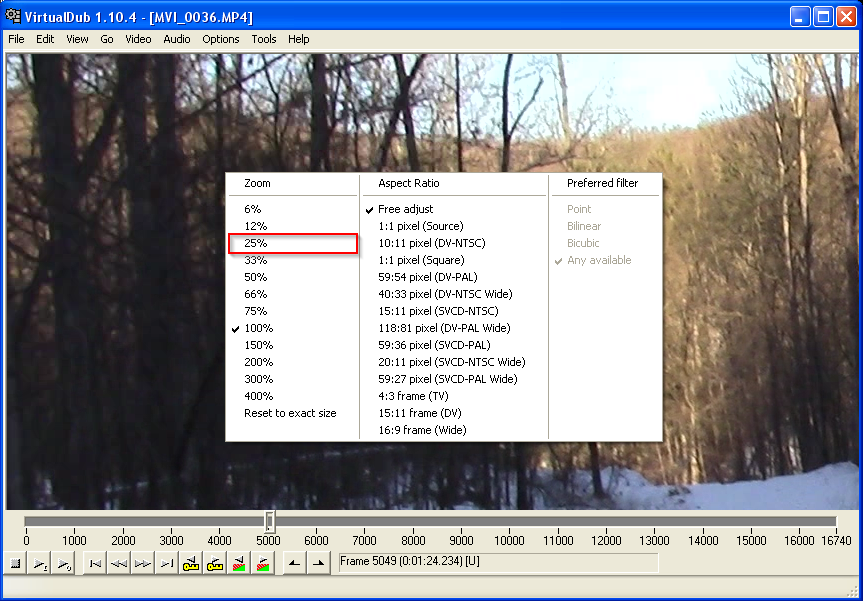
- After the video has been imported, you may find that the video is too large for the window. Simply right click on it and select 25% to reduce the size. In doing this, a second video window will also become visible. Select 25% for this second window.
- The window on the left displays your original video, while the one on the right shows what it will look like after conversion.
 |
| Resizing the left video window. |
 |
| Resizing the right video window. |
 |
- Click File > Save as AVI.
- If you receive the error "source image format is not acceptable", see here.
 |
| Video dub in progress, converting from 16:9 to 4:3. |
There you have it, a quick and easy way to alter the aspect ratio of a video clip. I hope you've found this quick tutorial useful!
Monday, January 27, 2014
Behind-the-scenes in the early days of Star Trek: TNG
Since I haven't posted lately (I have several new articles in the works), here's an interesting (but brief) look at the production of TNG in its first season. This segment aired in 1988 as part of the children's TV show 'Reading Rainbow', hosted by none other than LaVar Burton. This is considered one of the first behind-the-scenes features about the then-new series.
Thursday, January 9, 2014
ST: Phase II dives headfirst into Klingon politics in' Kitumba'
The present incarnation of Phase II (formally New Voyages) isn't on TV, but instead is a long-running web series, one of the first mainstream fan productions to hit the cyberwaves. Starring James Cawley as Kirk and produced by the Cawley Entertainment Company, Phase II has since turned into one of the most highly-regarded fan productions on the web.
What does the aborted Phase II TV project have to do with all this? One of the Cawley's goals is to produce scripts written for the aborted series. Two such episodes have already been released, in addition to five original stories and three vignettes (all of which can be downloaded here).
Phase II's most recent episode is 'Kitumba', a Klingon-centric show originally written by John Meredyth Lucas. Had it been produced in the '70's, 'Kitumba' would have established a very different culture for our favorite galactic warriors than what was later created for TNG.
'Kitumba' takes us to the heart of the Klingon Empire where Kirk and the Enterprise must convince the Empire's new, teenage ruler to stop a war with the Federation. The conflict could lead to mutual destruction for both sides, but is it the Emperor's war to stop?
This latest installment from Phase II does a nice job of bridging the gap between Original Series Klingons and their Next Generation counterparts. Not only does the show neatly tie up lose ends and unanswered questions, but also gives us a peek at Klingon politics and society in the 23rd century (something TOS was never able to do). 'Kitumba's many (subtle) tie-ins and references to other episodes also help it to fit almost seamlessly into established cannon.
As always, the production values and overall quality are very high. The CG effects shots (and there are quite a few of them) are top-notch and the acting, for the most part, very respectable. The show really does resemble a professionally-produced TV episode, clearly going to great lengths to get all the details right.
For those James Cawley fans out there, you may be sad to learn that this is his final appearance as Captain Kirk before turning the reigns over to actor Brian Gross. After playing the part for over 10 years, Cawley has decided to focus on the production aspects of the project, leaving the center seat to a new Kirk.
In a second notable change, Phase II will soon be transitioning to a refit version of the Enterprise, a stepping stone, transitory design to what was finally shown in The Motion Picture (see the vignette 'Going Boldly'). The redesigned ship was originally a facet of the '70s Phase II, and has been retained with virtually no changes. The interiors of the ship, however, will remain the same.
I have no way of knowing how close to the original story this episode turned out, but 'Kitumba' is a solid episode in its own right and definitely worth checking out. The show can currently be viewed on YouTube or downloaded via the Phase II site.
Phase II's next regular episode, 'The Holiest Thing', will premiere on February 14th.
Tuesday, January 7, 2014
Tech Tutorial: Printing from your Android Device
Happy New Year, all!
In this day and age of mobile technology, everyone seems to do more on the go rather than at their desk. Why not take that a step farther and print from your Android tablet or phone to that printer on your desk?
The concept of cloud printing isn't a new one, but has only come into widespread use in recent years. Printers with wireless capability allow anyone connected to that printer to produce a hard copy of almost any document, email, or web page, regardless of whether you're two feet away or anywhere on the planet. One of the best ways to go about this is using Google Cloud Print. Not only does this service support printing to any cloud-aware printer from almost any computing device, but also printers that are not wireless-capable or networked.
This article assumes that your printer supports cloud printing, has wireless capability, and is already configured. This process was tested using an HP printer.
What You Need:
The Process:
In this day and age of mobile technology, everyone seems to do more on the go rather than at their desk. Why not take that a step farther and print from your Android tablet or phone to that printer on your desk?
The concept of cloud printing isn't a new one, but has only come into widespread use in recent years. Printers with wireless capability allow anyone connected to that printer to produce a hard copy of almost any document, email, or web page, regardless of whether you're two feet away or anywhere on the planet. One of the best ways to go about this is using Google Cloud Print. Not only does this service support printing to any cloud-aware printer from almost any computing device, but also printers that are not wireless-capable or networked.
This article assumes that your printer supports cloud printing, has wireless capability, and is already configured. This process was tested using an HP printer.
What You Need:
- A wireless printer that supports cloud printing
- An Android device
- A Google account
The Process:
There are plenty of apps in the Play Store designed to provide printer support, but many you have to pay for. Google Cloud Print, on the other hand, is totally free and works with most applications.
The most current version of Android includes Google Cloud Print, so it's merely a matter of configuring the app for your specific printer.
Wireless-enabled printers usually have an email address that allows documents to be mailed directly to the device for printing (as an alternative to using cloud print services). This address also acts as your printer's identifier over the Internet.
Wireless-enabled printers usually have an email address that allows documents to be mailed directly to the device for printing (as an alternative to using cloud print services). This address also acts as your printer's identifier over the Internet.
- Go to the Google Cloud Print webpage to determine if your cloud-enabled printer is compatible.
- HP users need not worry as all HP ePrint printers are compatible with this service.
- Log into to your Google account.
- If you wish to configure printing for multiple Google accounts, simply set each one up individually using these same steps.
- Using your printer's web interface, front display panel, or documentation, locate the device's email address.
- Note that your printer manufacturer may require you to register your printer with them before the email address is made active.
- On the Cloud Print webpage, follow the prompts to register the address using your mobile device.
- Note that doing this from a device other than the one you wish to print from will configure that device for cloud printing.
- Print a test page to make sure configuration was successful.
- Google Cloud Print will give you this option after setup is complete.
- Test print from other apps (such as your browser, office suite, email client, etc.) to confirm that they've been properly configured as well.
- Your wireless printer should now appear under your app's print screen.
- For some apps, it may be necessary to manually select the Cloud Print option, as your mobile device may default to other print methods.
- If your device has the HP Print Service Plugin preinstalled, it can be disabled under Settings > System > Printing > HP Print Service Plugin.
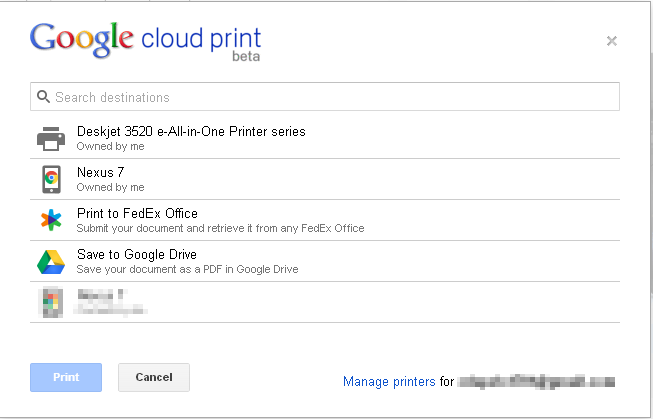
 |
| The Google Cloud Print screen on a desktop web browser. |
A note on privacy: as with any cloud-based application, you run the (small) risk of your documents being viewed by others who may intercept the print request. This chance is greatly reduced by the fact that all print requests are encrypted via HTTPS. In addition, Google keeps a copy of your document for a brief time to ensure the print went through properly, but this is deleted from their servers afterward.
If you have privacy concerns, I'd recommend using a local printer (that is, one that's only accessible by a directly-connected computer or over a home network) for documents containing personal or confidential information.
I hope you've found this tutorial useful in getting Google Cloud Print configured on your mobile Android device.
Subscribe to:
Posts (Atom)


