"Any significantly advanced technology is indistinguishable from magic." - from Arthur C. Clarke's Three Laws of prediction.
Showing posts with label tech tutorials. Show all posts

Wednesday, January 29, 2014

Tech Tutorial: Change a Video's Aspect Ratio Using VirtualDub

Recently, I was working on a video editing project in which I needed to change the aspect ratio of several clips to match the rest. After trying many free and trial programs that didn't give me the results I wanted, I stumbled upon VirtualDub.

VirtualDub is a "video capture and video processing utility for Microsoft Windows...designed to process linear video streams, including filtering and recompression." If you need to convert those pesky files but don't want to pay for it, this is a quick and easy solution.

At first glance, VirtualDub isn't much to look at, and doesn't appear very user-friendly. Don't let this discourage you -- VirtualDub is a powerful tool that gets the job done, and is quite usable even if you're not a multimedia expert. Just bear in mind that VirtualDub is not a general-purpose video editor; instead, it provides a few key tools to aid in your editing endeavors.

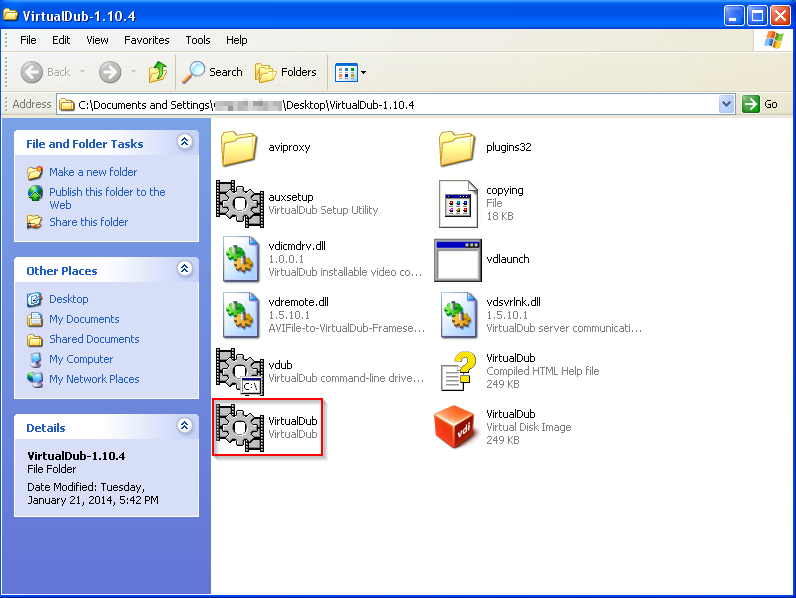
  • Download VirtualDub and extract the files from the zip archive. Launch the application (it's self-contained and requires no installation).

VirtualDub folder.
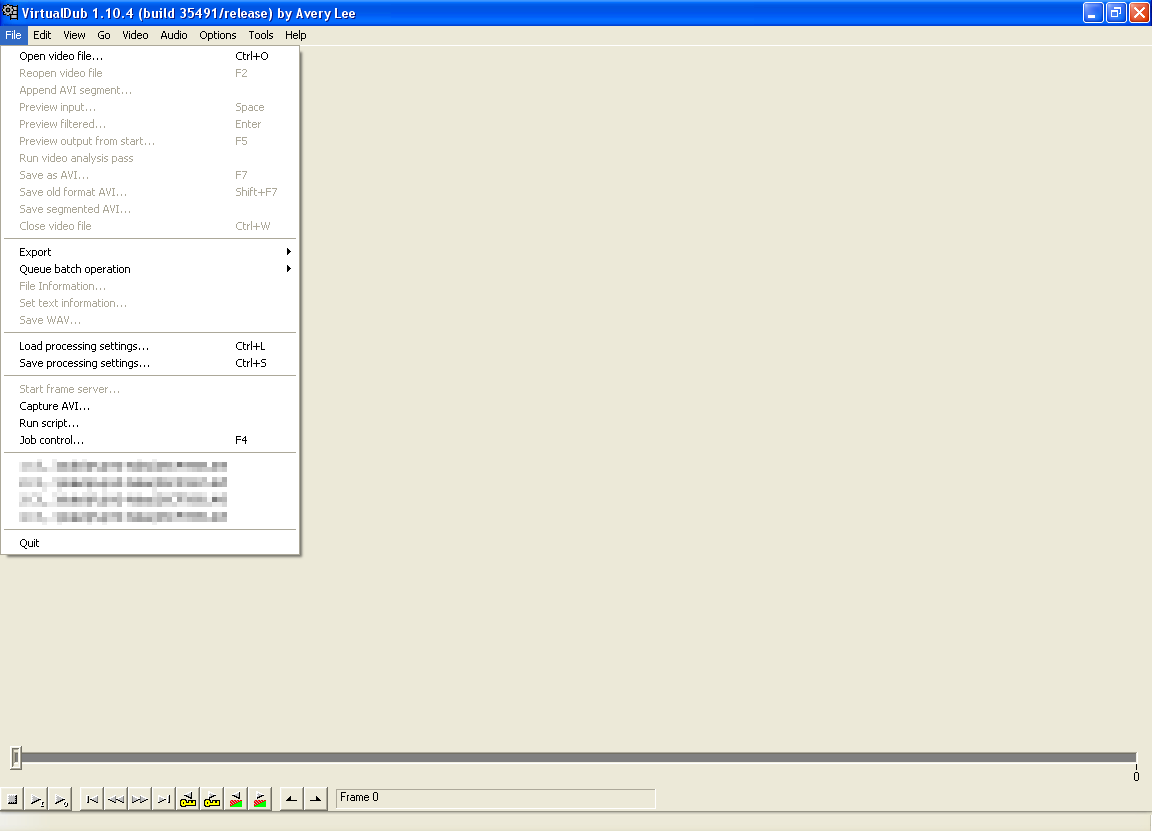
VirtualDub main window prior to video import.
  • Go to 'Video' > 'Filters'.

  • Click 'Add'. A new window will appear with a list of various filters. Scroll down to near the bottom of the list and select 'resize'. Click 'OK'.

'Add Filter' window.

  • Another new window will appear. Under 'Framing Options', click 'Crop to aspect ratio' and enter your desired aspect ratio (16:9, 4:3, etc.) in the fields below. Click 'OK'.
    • Note that selecting one of the letterbox options will add black bars to the top and bottom of your video. 
    • Inputting your desired pixel size in the 'Size Options' section allows you to manually crop a video beyond standard aspect ratios.

'Framing Options' window.

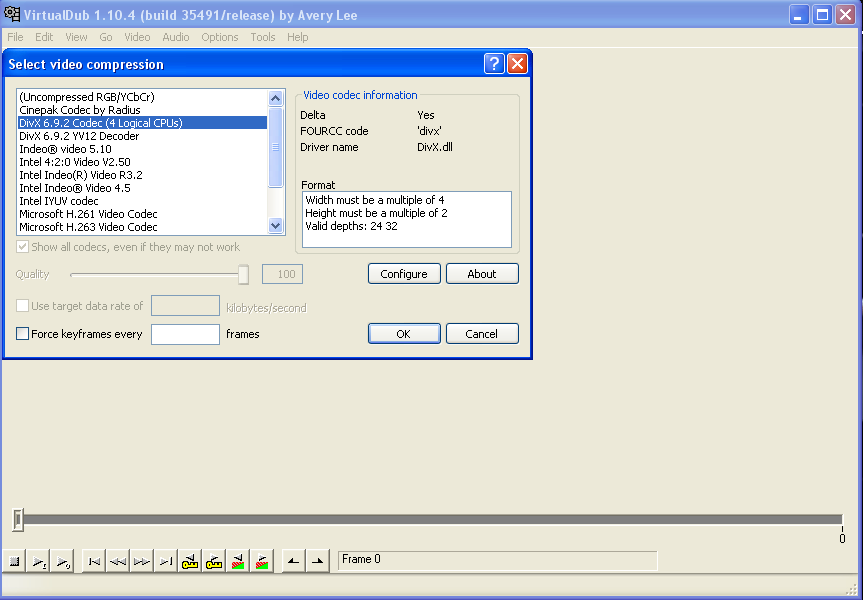
  • To compress your video, go to 'Video' > 'Compression' and select your desired compression codec. Click 'OK'.
    • Choosing to leave your videos uncompressed will result in very large file sizes.
    • Generally, the first DivX option is a good choice, but note that the codec you wish to use must already be installed on your computer.

'Video Compression' window.

  • Click 'File' > 'Open Video File' to import your clip.
    • If you're working with MPEG-4 files, download this unofficial Ffmpeg Input Driver (as the program does not support this format out-of-the-box).
    • Open either the 32 or 64-bit folder (check your version of Windows) and copy the contents into the 'plugins32' (or 'plugins64') folder of the VirturalDub directory.
    • In addition, if your video is encoded in H.264, this codec will allow you to open the file and save it without any DivX errors.

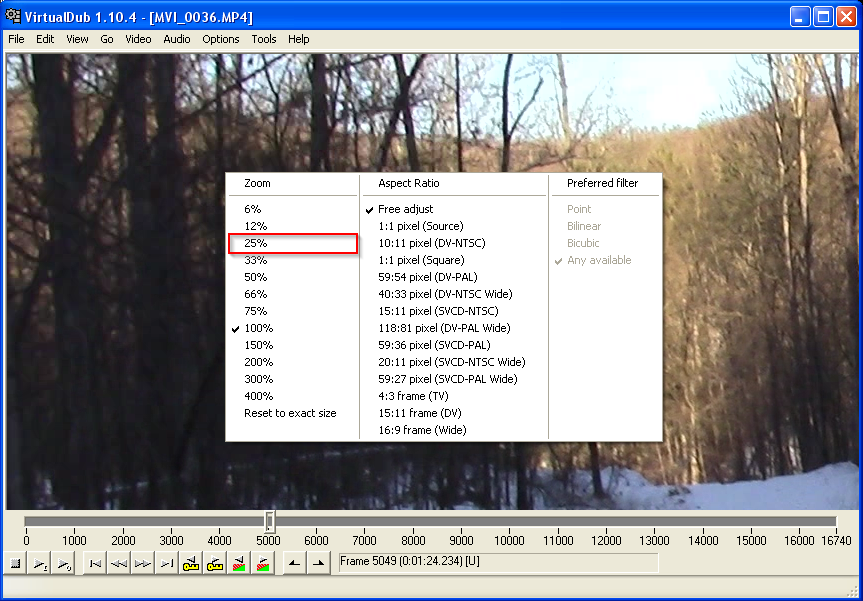
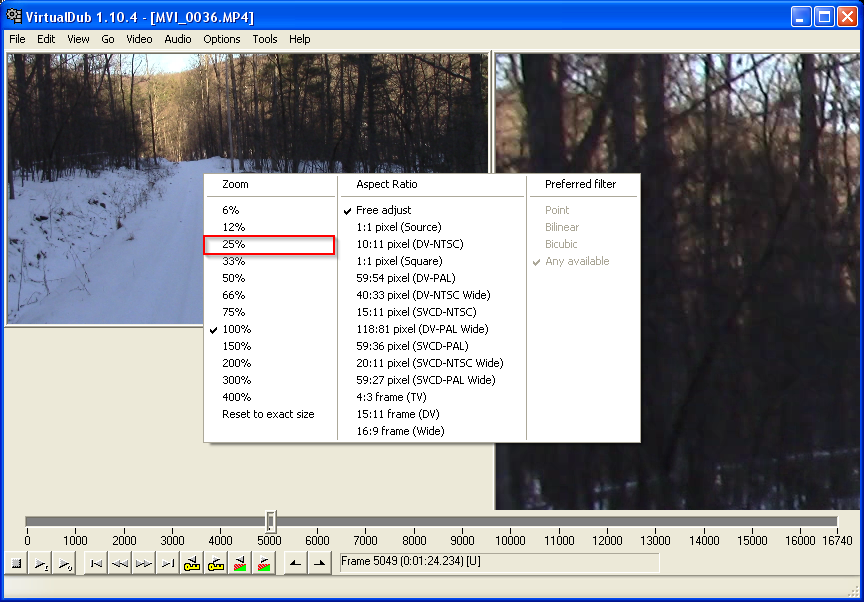
  • After the video has been imported, you may find that the video is too large for the window. Simply right click on it and select 25% to reduce the size. In doing this, a second video window will also become visible. Select 25% for this second window.
    • The window on the left displays your original video, while the one on the right shows what it will look like after conversion.

Resizing the left video window.
Resizing the right video window.

  • Click File > Save as AVI.
    • If you receive the error "source image format is not acceptable", see here.
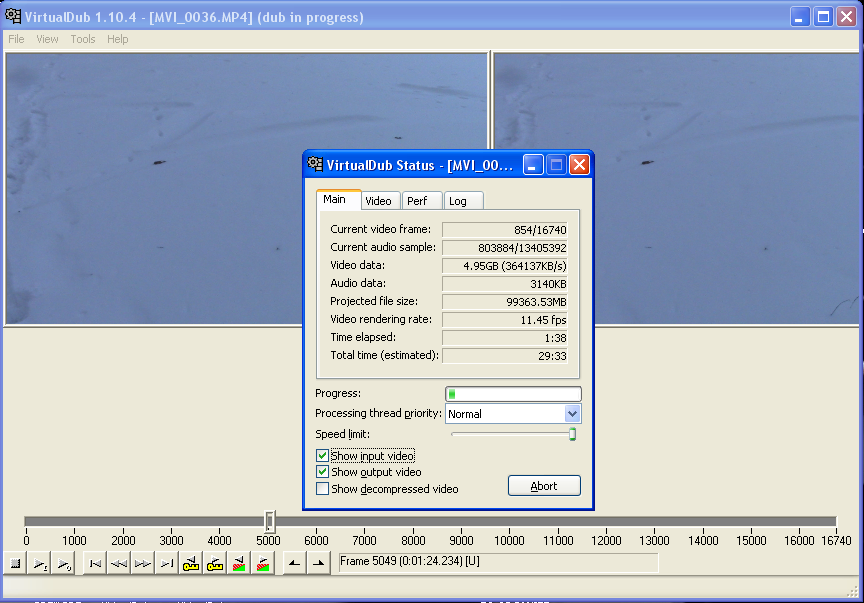
Video dub in progress, converting from 16:9 to 4:3.

There you have it, a quick and easy way to alter the aspect ratio of a video clip. I hope you've found this quick tutorial useful!

Tuesday, January 7, 2014

Tech Tutorial: Printing from your Android Device

Happy New Year, all!

In this day and age of mobile technology, everyone seems to do more on the go rather than at their desk. Why not take that a step farther and print from your Android tablet or phone to that printer on your desk?

The concept of cloud printing isn't a new one, but has only come into widespread use in recent years. Printers with wireless capability allow anyone connected to that printer to produce a hard copy of almost any document, email, or web page, regardless of  whether you're two feet away or anywhere on the planet. One of the best ways to go about this is using Google Cloud Print. Not only does this service support printing to any cloud-aware printer from almost any computing device, but also printers that are not wireless-capable or networked.

This article assumes that your printer supports cloud printing, has wireless capability, and is already configured. This process was tested using an HP printer.

What You Need:
  • A wireless printer that supports cloud printing
  • An Android device
  • A Google account

The Process:
There are plenty of apps in the Play Store designed to provide printer support, but many you have to pay for. Google Cloud Print, on the other hand, is totally free and works with most applications.

The most current version of Android includes Google Cloud Print, so it's merely a matter of configuring the app for your specific printer.

Wireless-enabled printers usually have an email address that allows documents to be mailed directly to the device for printing (as an alternative to using cloud print services). This address also acts as your printer's identifier over the Internet. 
  • Go to the Google Cloud Print webpage to determine if your cloud-enabled printer is compatible.
    • HP users need not worry as all HP ePrint printers are compatible with this service.

  • Log into to your Google account.
    • If you wish to configure printing for multiple Google accounts, simply set each one up individually using these same steps.

  • Using your printer's web interface, front display panel, or documentation, locate the device's email address. 
    • Note that your printer manufacturer may require you to register your printer with them before the email address is made active.  

  • On the Cloud Print webpage, follow the prompts to register the address using your mobile device.
    • Note that doing this from a device other than the one you wish to print from will configure that device for cloud printing.

  • Print a test page to make sure configuration was successful.
    • Google Cloud Print will give you this option after setup is complete.

  • Test print from other apps (such as your browser, office suite, email client, etc.) to confirm that they've been properly configured as well.
    • Your wireless printer should now appear under your app's print screen.
    • For some apps, it may be necessary to manually select the Cloud Print option, as your mobile device may default to other print methods.
    • If your device has the HP Print Service Plugin preinstalled, it can be disabled under Settings > System > Printing > HP Print Service Plugin.

The Google Cloud Print screen on a desktop web browser.


A note on privacy: as with any cloud-based application, you run the (small) risk of your documents being viewed by others who may intercept the print request. This chance is greatly reduced by the fact that all print requests are encrypted via HTTPS. In addition, Google keeps a copy of your document for a brief time to ensure the print went through properly, but this is deleted from their servers afterward. 

If you have privacy concerns, I'd recommend using a local printer (that is, one that's only accessible by a directly-connected computer or over a home network) for documents containing personal or confidential information.

I hope you've found this tutorial useful in getting Google Cloud Print configured on your mobile Android device.

Thursday, October 24, 2013

Tech Tutorial: Installing Opera Mini on the LG840G

Opera Mini is a portable version of the Opera desktop web browser designed to run on mobile devices. In this tech tutorial, we're going to spruce up the LG840G Tracfone (full review to follow) with a browser upgrade, making the phone's 3G/wi-fi connectivity a bit more practical to use. We'll also disable the annoying Java keypad, which, by default, takes up half the screen and just gets in the way.

Keep in mind that even with this upgrade, browsing on the 840G is far from ideal. It works well for what it is, but isn't a replacement for a tablet or other 'true' mobile device. Opera runs fine, but does lag a bit.

I've found that the easiest way to get Opera up and running is to download it on a desktop PC, edit the config file to disable the keypad, and then transfer the file to your phone.

Part 1: Download & Modify the Opera Mini installer
  • On a desktop PC, go to the Opera website and download the latest version of the browser (at the time of this writing, version 7.1). The installer will be a .jar file archive/executable.
  • Now it's time to disable the Java keypad. Open the archive using your favorite zip file extractor, such as 7-Zip. Assuming you're using 7-Zip, right click > 7-Zip > Open Archive.
  • Locate the META-INF folder and double click on it. Within the folder, right click on the file META-MF > Edit. The META-MF file will open in your default text editor, such as Notepad.
  • Copy and paste the following below the existing lines of code:
    • Nokia-MIDlet-No-Exit: true
      Nokia-MIDlet-On-Screen-Keypad: no
      Navi-Key-Hidden: true
      UseNativeTextButtons: hide
      ReverseSoftkeys: hide
      UseNativeCommands: hide
      MIDlet-Touch-Support: true
      MIDlet-ScreenMode: ROTATE
      MIDlet-Landscape-Support: true
      LGE-MIDlet-Width: 240
      LGE-MIDlet-Height: 400
      LGE-MIDlet-On-Screen-Keypad: no
      LGE-MIDlet-Display-Mode: both
  • Click File > Save and then close the window.
  • 7-Zip will ask if you wish to modify the archive with your changes. Click 'Yes' and close the 7-Zip window.

Part 2: Install Opera Mini on the 840G
  • Connect the 840G to your computer using a standard micro-USB data cable (keep in mind that a micro-SD card must be installed to do this). 
  • The phone will ask you if you wand to 'connect as mass storage'. Tap 'OK'. The phone will now display 'Connected as Mass Storage Mode'.
  • On your PC, locate your phone under 'Computer' or  'My Computer' -- it will show up as a removable storage device.
  • Copy the modified Opera Mini installer to your phone's memory. Note it does not have to be placed in any of the existing folders.
  • On the phone, tap 'Exit' and then disconnect the cable. The phone will display 'waiting' until cable is unplugged.
  • Open the 840G's File Manager (found on the second page of the apps tray) and locate the Opera installer under the memory card tab. Tap to launch.
  • The phone will display 'Untrusted Midlet'. Tap 'Continue'.
  • At the next screen (displaying information about Opera Mini), click 'Download' to begin the installation.
  • Opera Mini will then install, which should only take a few seconds. At the 'Download Completed' window, tap 'Launch Now' (if your wireless is not enabled, the phone will automatically connect via 3G and use airtime).
  • Opera Mini, sans the Java keypad, can now be found under 'Games & Apps'. For quick access, add 'Games & Apps' to your shortcuts home screen (unfortunately, there doesn't seem to be a way to make a dedicated shortcut).

With a few other adjustments (such as setting the browser to both landscape and fullscreen modes), Opera Mini works well on the 840G for basic web access. I mainly use it to check email since the phone's built-in client doesn't seem to work. My only real complaint is the on-screen keyboard has very small buttons, making typing anything quite tedious. My suggestion: take advantage of bookmarks.

Interested in installing other Java-based apps? It's as simple as downloading the file on your PC and copying it to the phone's memory (or downloading the app on the phone itself). Then, simply launch the installer. Any installed apps will appear under 'Games & Apps'.

I hope you've found this quick tutorial useful in getting Opera Mini setup on your LG840G Tracfone. Happy web browsing!

Wednesday, August 21, 2013

Digitizing Vinyl Using Audacity: A Tutorial

For those of you out there who have a whole library of vinyl records, or even just a few worth saving, I've found a system for easily dubbing them to digital using the free audio-editing program Audacity. The process is time-consuming, but it's also much more straight-forward then trying to digitize other analog mediums (8mm tapes, anyone?). This process also has the advantage of minimal to no cost if you already have the necessary hardware. Give this process a try and let me know what you think!

What You'll Need
  • A turntable with red & white RCA connections
  • If your player does have connections in the back, you'll still need the RCA to 3.5mm cable, just not the coupler.
  • A Windows, Mac, or Linux-based computer with Audacity installed and standard 3.5mm audio connections (Line In).
  •  Records to dub.

Step 1: Obtain a Record Player and Related Equipment
Obviously, if you're going to do this job, you'll need a record player. I'm not saying go out any buy a brand-new one; a cheap, used yard sale unit with no bells-and-whistles will work just fine (trust me, that's what I'm using). Make sure the unit works, first, and find out if it has RCA connections and speed controls.

If you find yourself with a player that only has wired-in RCA cables and no jacks, pick up the cable and coupler I listed above. You'll need those to link the player with your PC.

Step 2: Install Audacity & Hook Everything Up
Once you've obtained all the necessary hardware, it's time to download and install Audacity. Audacity is a free, open-source, multi-platform audio-editing program that works really well for dubbing vinyl.

Plug in the record player and run your RCA cables from the player's white and red jacks to your computer's Line In input. If your player only has wired-in cables, connect the red and white plugs to the matching female jacks on the coupler. Connect the RCA connections from your RCA to 3.5mm cable to the other end. Finally, the 3.5mm jack will go into the back of your computer.


Step 3: Configure and Test Your Setup
Before you get too excited and start dubbing an entire record, let's configure everything and make sure the setup works. Carefully pop a record out of its slip case and put it on the turntable. Make sure the playback speed matches what's listed on the record itself. If the label doesn't say either way, take a guess (you'll find out if you guessed correctly after the test dub).

 Launch Audacity and adjust the input channel settings on the third toolbar from the top (image below). The record label should also say whether the record is meant to play in stereo (multiple-track audio) or Mono (one-track audio). The easiest way to tell is to play back the record through a set of speakers or headphones. If the sound coming out of both speakers is exactly the same, then the record is in Mono. If different elements can be heard coming from one side or the other, you're most likely in Stereo. Adjust the input settings appropriately.


On the same toolbar, to the left of the input channel settings, check to make sure your input and output devices are the ones you would normally use. You may need to experiment if you're not sure.

With everything in place, turn on your player and prepare to drop the needle onto the record. Hit the red record button in Audacity and begin playing the record. As it plays, the sound is represented by the audio graph in the center of the window. If your record is in Stereo, you should see two separate sets lines, one above the other. Watch to see whether the lines form 'peaks' -- this is a sign that the program is actually picking up the incoming audio and not just recording dead air (represented by a flat line with no fluctuations). The larger the peaks, the louder the audio being picked up.

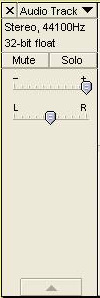
Let the dub run for 30 seconds or a minute and then hit 'Stop'. Pull the arm off the record. In the 'Audio Track' pane to the left of your wavy lines, move the first slide-switch (the one with plus and minus) all the way to the right. This will increase the gain to maximum, ensuring you're hearing as much of the original audio as possible. If this slider is not adjusted, you may find it very difficult to hear your music (even with volume turned way up). Hit 'Play' and see what happens.

Step 4: Dub Your Collection
If the dub was successful, go back and do the record in its entirety (make sure to save the project file after you're done). When completed, play the recording from the top. At the end of the first song, take note of the beginning and ending times (for the first track, the beginning time index will be 00.00.00). Enter the times into the toolbar at the bottom of the window and the first song will be selected.


Click 'File' > 'Export Selection' to save the track as an .mp3 file. The program will also give you the chance to enter the track's meta data. Note that if you hit 'Pause' between tracks rather than 'Stop', the program won't allow you to save the file.

Continue playback and save each individual song the same way. After Side A is completed, flip the record over and repeat the process.

I hope this process helps someone out there looking for an easy way to tackle this kind of project.

Wednesday, February 20, 2013

Tech Tutorial: Replacing a Case Fan

Rosewill RFX120BL
If you've ever built your own PC before, than you know the importance of proper airflow and fan placement. Fans keep your system's critical components from overheating during normal operation, and especially during high-end gaming and other resource-intensive applications.

But what do you do if your case fan begins showing signs of failure? Where do you go to pick up a replacement? How is it installed? This brief tutorial will answers these questions and more.

Late last week, I discovered that my front case intake fan was on the verge of failing, so I knew it was time to replace it. I built my current rig about a year-and-a-half ago, and this is the first time I've had to replace any components. In the big scheme of things, though, fans are considered disposable parts that wear out after some period of time. Mine wasn't a high-end unit to start with, so I really can't complain too much.

Replacing a case fan really isn't too difficult; you just have to be willing to crack the case, deal with some screws, and hook up a few cables. 

What You'll Need
  1. A PC with a failing case fan
  2. A replacement case fan of the correct size and type
  3. An appropriate-sized screwdriver
  4. A small container for loose screws
  5. A clean workspace
Step 1 - Pick a Replacement Fan
Okay, so you're doing some work on your PC and all of a sudden notice your case fan is making a heck of a racket, rattling, grinding, or running loud (especially when you first power it on). Don't panic; you have plenty of time to remedy the situation. Just don't hold off too long. These sounds are all classic signs of a failing case fan. Since there's no fixing them, it's time to go shopping.

If you don't know already, determine the size of your fan (for example, mine was 120mm) and what type of connector it uses (ex. 3 or 4-pin Molex ). These bits of information are important when it comes to buying a replacement (fans aren't a 'one size fits all' product). If you're unsure, you may need to check the fan's label or look up the model number online.

Drop by an online computer hardware store like Newegg or Tiger Direct and begin researching fans that are of the correct type for your PC. A decent fan can run you anywhere between $5 and $30. For the average user, something in the $10 range is more than sufficient. If you're concerned about noise, check user ratings and/or the fan's specs to see how loud it runs (in decibels).

If you want to add a little 'bling' or 'style' to your PC, consider picking up a fan with built-in LED lighting. Depending on the model, fans like this can deliver either a very soft or very bright glow (enough to illuminate the insides of your case), assuming your case is set up for it. This really doesn't serve any practical purpose, but it does take things up a notch.

Some fans also come with a fan controller, a device for regulating the speed of your fan. This is especially helpful for people doing high-end gaming or other heavy graphics applications that use lots of processing power. I normally wouldn't bother with one myself, but the replacement I ordered came with one and the fan itself ran pretty load without it.

Step 2 - Open Up the Case
Once your replacement fan has arrived, it's time to crack the case and get to work. Make sure to disconnect main power before popping anything open! Even shut down, most computers have a small amount of current running through them.

After unplugging everything, find a flat workspace (a table, the floor, etc.) to spread out our equipment. Depending on your case, there may be two or more screws that need to be removed in order to slide off the side panel (if you have a really old machine, figuring this out may be a bit tricky...). Find a secure place to put your screws so they don't get lost (a small bowl works nicely).

Once the case is open, make sure to ground yourself against a metal surface (such as the case itself) to prevent static discharge from frying components. If you happen to have an anti-static wrist strap, you may want to don that as well.

You may also want to take the opportunity to blow a few dust bunnies out of your case using compressed air. I don't know about yours, but mine was pretty dusty, and I should know better!


 Mine was held on by two screws on the top and bottom edges of the panel. 


The panel should slide off to the left.

Step 3 - Locate and Remove the Old Fan

If you have multiple fans in your case, make sure you've confirmed which one is actually failing (you'd hate to pull out the wrong one...). Once you know for sure, locate the screws holding it in place and carefully remove them with a screwdriver.

If the fan is at the front of your case, removing the front panel may be in order. Generally, they're held in place by plastic clips, so be careful not to break them off.


Fans (especially lower-end ones) are notorious for having cheap screws and non-threaded holes on the fan itself, so it may take a little muscle to remove. In most cases, the screws go in from the outside of the case.

With the screws gone, disconnect the 3 or 4-pin connector, which is connected to a fan port on the motherboard (if you're lucky, it'll be labeled 'fan'), or tied directly into the power supply. For the former, gently remove the connection, being careful not to bend any pins.

For the ladder, locate the short cable that allows the fan connector to be joined with a 4-pin power supply connector and disconnect the fan end only. These types of setups are used when no free fan connections are available on the motherboard itself. Some fans may even come with this cable if you don't already have one. With all these connections free, remove the old fan from the case and set it aside.

Center: two molex power connectors (male/female). 
Lower Right: two four-pin fan connectors (male/female).


Step 4 - Mount the New Fan
With your old fan out of the way, it's time to hook up the new one. You may find it useful to pre-thread the fan's screw holes before attempting to mount it. This can be done using one of the provided screws, but only if necessary.

Line up the fan with the mounting screw holes on the case (this may be a bit tricky depending on where your fan is located). Try to align the power cable so it'll be easy to hook up later. Screw in the first screw (there's a good chance it'll be pretty stiff), but don't put it in all the way. Instead, start the other three just like the first one. Once they're all in part-way, finish tightening them. This'll make it a lot easier to make sure the holes are lined up and allow you to adjust for shifting along the way. Don't be afraid to turn the screws in tight; just don't over-tighten them. You want the fan to have no wiggle room, otherwise, it'll shake and rattle while its running, eventually coming loose altogether.

Step 5 - Hook Up Main Power
With the fan mounted securely to your case, it's time to hook up power. If you do have an open fan connector on your motherboard, plug it in. Otherwise, reconnect it to the power supply cable I mentioned above.

Note that if your fan happened to come with a controller, and you'd like to take advantage of it, your wiring scheme will be a bit different. In my case, I connected a 4-pin male power connector coming off the controller with a matching female connection coming off the power supply. Then, I connected the fan power cable to a female fan connection also coming off the controller. In this setup, the power supply is providing power to the controller, which in turn is providing power to the fan. Since the controller is an intermediary, one can control the power going to the fan, and therefore, the speed.

Step 6 - Put Everything Back Together
Before putting it all back together, tie up any extra-long cables with twisties so they don't interfere with anything. Especially watch out for any cables that may get caught in the fan blades. Reattach the side panel to your case and hook up all your external connections (with the power cable last). Hit the power button. If all went according to plan, your new fan should power right up (also don't be surprised if it sounds a bit different than your used to). If not, check all your connections and make sure everything's been wired correctly. The two most likely causes of your fan not working are 1) defective unit, or 2) fan isn't getting any power.


The old fan, a CoolerMaster SickleFlow 120mm 2000 RPM w/ Blue LED


...and the new one, a Rosewill RFX-120BL 120mm 2 Ball Bearing w/ Blue LED

Look at that glow! Much brighter than the original.
You won't be able to sleep with this one on!

That's it for this tech tutorial. Hopefully, you've found it helpful (feel free to comment) and make sure to drop by The Enterprise Bridge for similar articles in the future!