

What You'll Need
- A turntable with red & white RCA connections
- If your turntable is an inexpensive one and does not have any connections, then you'll require a female-to-female RCA coupler and an RCA to 3.5mm audio cable to link it to a computer.
- If your player does have connections in the back, you'll still need the RCA to 3.5mm cable, just not the coupler.
- A Windows, Mac, or Linux-based computer with Audacity installed and standard 3.5mm audio connections (Line In).
- Records to dub.
Obviously, if you're going to do this job, you'll need a record player. I'm not saying go out any buy a brand-new one; a cheap, used yard sale unit with no bells-and-whistles will work just fine (trust me, that's what I'm using). Make sure the unit works, first, and find out if it has RCA connections and speed controls.
If you find yourself with a player that only has wired-in RCA cables and no jacks, pick up the cable and coupler I listed above. You'll need those to link the player with your PC.
Step 2: Install Audacity & Hook Everything Up
Once you've obtained all the necessary hardware, it's time to download and install Audacity. Audacity is a free, open-source, multi-platform audio-editing program that works really well for dubbing vinyl.
Plug in the record player and run your RCA cables from the player's white and red jacks to your computer's Line In input. If your player only has wired-in cables, connect the red and white plugs to the matching female jacks on the coupler. Connect the RCA connections from your RCA to 3.5mm cable to the other end. Finally, the 3.5mm jack will go into the back of your computer.


Step 3: Configure and Test Your Setup
Before you get too excited and start dubbing an entire record, let's configure everything and make sure the setup works. Carefully pop a record out of its slip case and put it on the turntable. Make sure the playback speed matches what's listed on the record itself. If the label doesn't say either way, take a guess (you'll find out if you guessed correctly after the test dub).
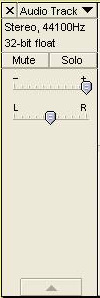
Launch Audacity and adjust the input channel settings on the third toolbar from the top (image below). The record label should also say whether the record is meant to play in stereo (multiple-track audio) or Mono (one-track audio). The easiest way to tell is to play back the record through a set of speakers or headphones. If the sound coming out of both speakers is exactly the same, then the record is in Mono. If different elements can be heard coming from one side or the other, you're most likely in Stereo. Adjust the input settings appropriately.
On the same toolbar, to the left of the input channel settings, check to make sure your input and output devices are the ones you would normally use. You may need to experiment if you're not sure.
 With everything in place, turn on your player and prepare to drop the needle onto the record. Hit the red record button in Audacity and begin playing the record. As it plays, the sound is represented by the audio graph in the center of the window. If your record is in Stereo, you should see two separate sets lines, one above the other. Watch to see whether the lines form 'peaks' -- this is a sign that the program is actually picking up the incoming audio and not just recording dead air (represented by a flat line with no fluctuations). The larger the peaks, the louder the audio being picked up.
Let the dub run for 30 seconds or a minute and then hit 'Stop'. Pull the arm off the record. In the 'Audio Track' pane to the left of your wavy lines, move the first slide-switch (the one with plus and minus) all the way to the right. This will increase the gain to maximum, ensuring you're hearing as much of the original audio as possible. If this slider is not adjusted, you may find it very difficult to hear your music (even with volume turned way up). Hit 'Play' and see what happens.
Step 4: Dub Your Collection
If the dub was successful, go back and do the record in its entirety (make sure to save the project file after you're done). When completed, play the recording from the top. At the end of the first song, take note of the beginning and ending times (for the first track, the beginning time index will be 00.00.00). Enter the times into the toolbar at the bottom of the window and the first song will be selected.

Click 'File' > 'Export Selection' to save the track as an .mp3 file. The program will also give you the chance to enter the track's meta data. Note that if you hit 'Pause' between tracks rather than 'Stop', the program won't allow you to save the file.
Continue playback and save each individual song the same way. After Side A is completed, flip the record over and repeat the process.
I hope this process helps someone out there looking for an easy way to tackle this kind of project.
No comments:
Post a Comment